Go Graphics - Designing Book Covers Programmatically With Golang

Table of Contents
↑Introduction

I turned my article using SQLite to generate documentation into a PDF which I then shared on LinkedIn.
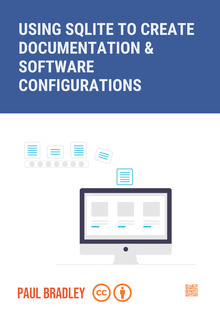
To make it stand out, I designed a front cover. As I may decide to share other articles, I wanted the front covers to follow the same theme. Keeping the front covers formulaic in their design is easy when you generate the images programmatically.
This article covers how I wrote a Go command-line utility to generate the cover. I’ll also include links to resources to help you find fonts and images to use in your designs.
↑Install the go graphics package
We’ll leverage Michael Fogleman’s Go Graphics package in this example. This package will do lots of the graphics heavy lifting.
To install the package, use the following command from the terminal:
1go get -u github.com/fogleman/gg
↑Defining the variables
We start by defining a canvas variable. The NewContext function returns a new image with the specified height and width. The canvas variable uses a context allowing us to render additional items into the image.
We then define some colour variables that we’ll use within the code. We are using the colour.RGBA function to specify the red, green and blue values needed for each colour. The fourth value passed into the colour.RGBA function is the opacity of the colour, where 255 equals 100% opacity.
Finally, we set the height in pixels of the title area. This value allows us to offset and position the central image.
1var canvas = gg.NewContext(1787, 2555)                // size of the image canvas
2
3var colorBlue = color.RGBA{60, 92, 153, 255}          // blue with full transparency
4var colorWhite = color.RGBA{255, 255, 255, 255}       // white with full transparency
5var colorTitleText = (color.RGBA{255, 255, 255, 230}) // white with a reduced transparency
6var colorAuthorText = (color.RGBA{237, 89, 47, 255})  // dark grey with full transparency
7var heightTitleArea = 920                             // height in pixels of the title area
↑The main function
The main function is shown below. As you can see, we use four custom functions before calling the SavePNG function, which saves the image to a file on disk.
Firstly, a function paints a solid colour for a given rectangle, allowing us to draw the blue and white rectangles. Secondly, a function loads an image from the disk and defines where to place it on the current canvas. This function allows us to position the main central image and supplementary images for the creative commons logos and the QR code.
Finally, there are functions to set the title text and the author text.
 1paintColorRectangle(colorBlue, 0, 0, canvas.Width(), heightTitleArea)
 2paintColorRectangle(colorWhite, 0, heightTitleArea, canvas.Width(), canvas.Height())
 3
 4loadAndInsertImage("undraw_data_processing_yrrv.png", 0, heightTitleArea+100)
 5setTitleText("USING SQLITE TO CREATE DOCUMENTATION & SOFTWARE CONFIGURATIONS", 150, 135)
 6setAuthorText("PAUL BRADLEY", 125)
 7
 8loadAndInsertImage("cc.xlarge.png", 750, 2300)
 9loadAndInsertImage("by.xlarge.png", 920, 2300)
10loadAndInsertImage("qrcode.png", 1500, 2300)
11
12err = canvas.SavePNG("cover.png")
13return err
↑Painting colour
The paintColorRectangle function accepts five parameters. The first is the colour we want to paint, followed by four numbers representing the rectangle’s upper left and lower right coordinates.
The canvas’s coordinate system denotes that 0,0 is the upper left corner. Bear this in mind: the coordinates will increase as you move down and right from the top left corner.
We use the SetColor function to define the colour passed and then use DrawRectangle to specify the coordinates. Finally, we use the Fill command to flood fill and paint the defined area with the designated colour.
1func paintColorRectangle(c color.Color, x, y, w, h int) {
2    canvas.SetColor(c)
3    canvas.DrawRectangle(float64(x), float64(y), float64(w), float64(h))
4    canvas.Fill()
5}
↑Loading and Inserting Images
Our loadAndInsertImage function accepts three parameters. The first is the image file we want to paste into the canvas. The last two parameters are numbers defining the upper left location where the image should be pasted onto the canvas.
Firstly, we attempt to load the image file and check for any errors. We print an error message and exit the program if an error is detected.
If no error was detected, we use the DrawImage function to paste the image onto our canvas.
1func loadAndInsertImage(imgFile string, x, y int) {
2    backgroundImage, err := gg.LoadImage(imgFile)
3    if err != nil {
4        fmt.Fprintf(os.Stderr, "%s\n", err)
5        os.Exit(1)
6    }
7    canvas.DrawImage(backgroundImage, x, y)
8}
There are a couple of places you can legally get images to include on your book cover. These include:
- unDraw — Open-source illustrations for any idea you can imagine.
- Unsplash — Beautiful free images & pictures
- midJourney — or use AI to create your cover images.
↑Typesetting the title
To typeset the main title, we use our setTitleText function, which accepts three parameters. The first parameter is the text we want as the main title.
The second parameter is a number which represents a margin value in pixels. The margin defines how close to the image edge the text should be allowed to go.
The last parameter is a number which defines the font size in pixels.
 1func setTitleText(title string, margin int, size int) {
 2    // load the font file and set the font size
 3    if err := canvas.LoadFontFace("RobotoCondensed-Bold.ttf",
 4        float64(size)); err != nil {
 5            fmt.Fprintf(os.Stderr, "%s\n", err)
 6            os.Exit(1)
 7    }
 8
 9    // set the font text color and output the title text
10    // using a defined margin - centering the text bounding
11    // area within the title area
12    canvas.SetColor(colorTitleText)
13    canvas.DrawStringWrapped(title,
14        float64(canvas.Width())/2,
15        float64(heightTitleArea)/2,
16        0.5,
17        0.5,
18        float64(canvas.Width()-(margin*2)),
19        1.5, // line height
20        gg.AlignLeft)
21}
We start by using the LoadFontFace function to load the font file from the disk and specify the font size. Next, we check that the font file was correctly loaded. We print out the error message and exit the program if an error is detected. If you need to find font files, then Google Fonts is a good source, and Google allows you to download the font files.
Once the font file has loaded, we set the colour of the text using SetColor.
The DrawStringWrapped function word-wraps the specified string to the given max width and then draws it at the specified anchor point using the given line spacing and text alignment.
Typesetting the author’s name
Outputting the author’s name is a little easier as we don’t have to use word wrapping. We load the font file as before. Set the colour and then use the DrawString function to output the given string at the defined position.
1func setAuthorText(author string, size int) {
2    if err := canvas.LoadFontFace("BebasNeue-Regular.ttf", float64(size)); err != nil {
3        fmt.Fprintf(os.Stderr, "%s\n", err)
4        os.Exit(1)
5    }
6
7    canvas.SetColor(colorAuthorText)
8    canvas.DrawString(author, float64(140), float64(2420))
9}
↑Saving the book cover to a PNG file
Finally, we save the canvas image to a disk file using the PNG image format. The function below shows you how to create a disk file. It also demonstrates how to Encode the image as a PNG file
 1func SavePNG(img image.Image, filename string) error {
 2    f, err := os.Create(filename)
 3    if err != nil {
 4        return err
 5    }
 6    defer f.Close()
 7    if err := png.Encode(f, img); err != nil {
 8        return err
 9    }
10    if err := f.Close(); err != nil {
11        return err
12    }
13    return nil
14}